FAQs
Common questions and troubleshooting.
Table of Contents
Number
Question
Warning: You don't have permissions to use this

If you receive this error when trying to use a command or button, it can be caused by one of the following reasons:
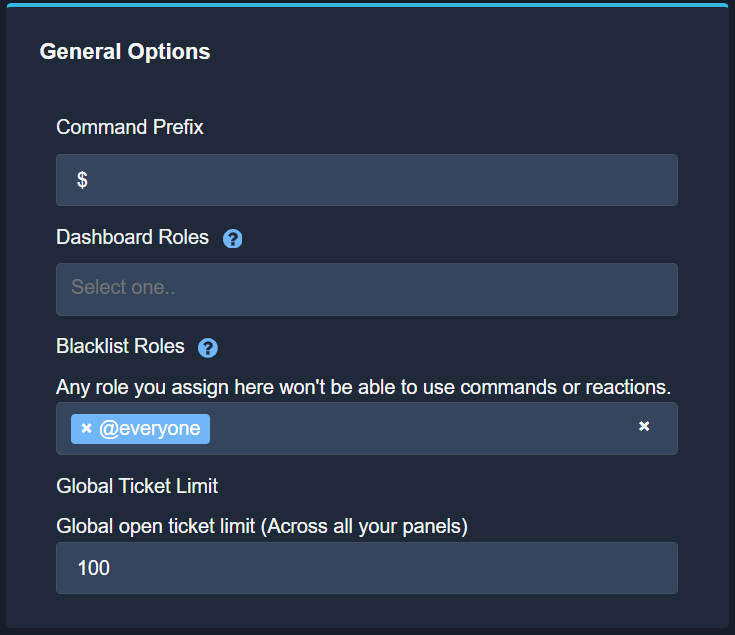
You have a blacklisted role, go ahead and log into the Dashboard, then head to the
Server Configsand check which are the Blacklisted Roles. Remove any unwanted role and Save changes.

If @everyone role is blacklisted, no one will be able to use the buttons or commands in your server.
Check the permissions of the button by going to the
Panel Configs, open theButton Option- Create ticket, and check which roles have been selected asDisabled Roles, a user with one of these roles will not be able to use this feature. If theSupport Team roleoption is enabled then your staff and only your staff will be able to interact with this button, not your server users.


The bot doesn't respond to my commands
Try these solutions:
Run
$debugin the channel you are trying to use the commands, the bot will answer with an embed, if it doesn't, check the bot has all required permissions in its role, the category and the channel.Make sure you have selected the proper bot in your
Server Configs, if you see something such as BOT ERROR fix it by following this process:

Refer to Question #1, Warning: You don't have permissions to use this, check you don't have any Blacklisted Role.
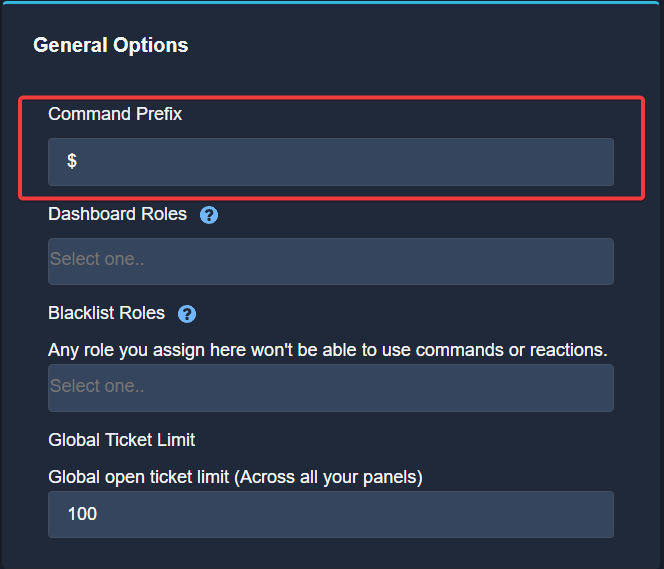
Double check the prefix you are using for your commands, do this by going into your Dashboard and opening the
Server Configs:

If none of these solutions work, visit our Support Server and open a ticket so our Support Team can assist you.
I can't see my server on the Dashboard
Firstly, double check you have the required permissions to access the Dashboard, you need one out of the following things:
Having
Administratorpermission on the serverBeing the Owner of the server
Although having the Manage Server permission allows you to invite Ticket Tool to your server, you need the Administrator permission to edit its configuration in the Dashboard.
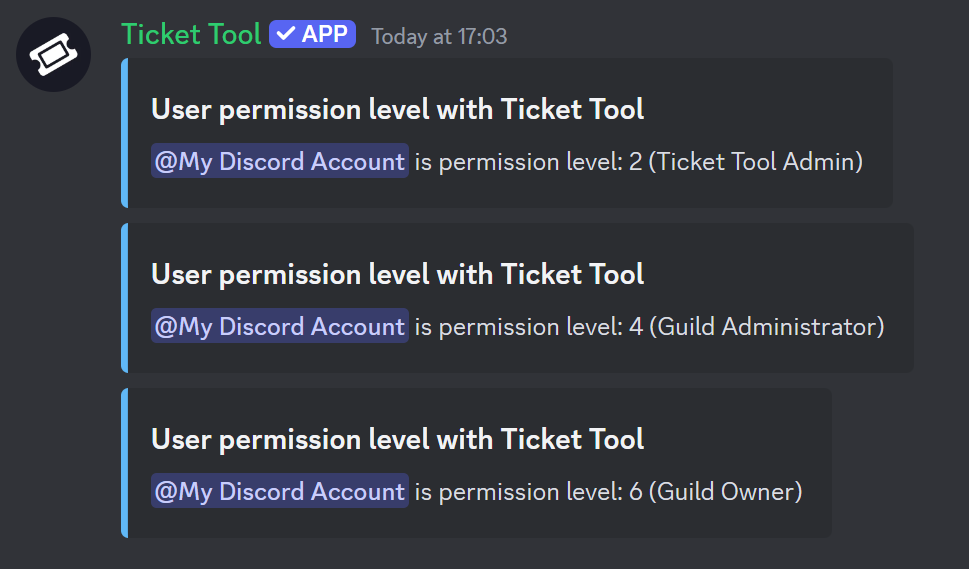
To check your level, run $level in a text channel of your server, the bot should send a response similar to one of these:

If the response of the bot looks something like this:

It means you can't actually edit the configurations of the bot, ask the Server Owner or the Administrators to give you the needed permissions.
If the bot is not responding to the level command, check our FAQ about this topic
What is the prefix and how do I change it?
By default the prefix of the bot is $, to modify it follow these steps:
Go into the Dashboard
Open the Server Configs
Update the prefix editing the Command Prefix field
Save changes

How do I let my support team see into a ticket?
Go into the Dashboard
Open the Panel Configs
Open the General section
Select the Support Team roles you want to be able to see into your tickets
Save changes

For more information on the topic, check the Support Team Roles Documentation
Take into account that your new Support Team Roles will only be able to see new tickets, the settings won't apply to old tickets.
How do I make a ticket ping my support when it's created?
Go into the Dashboard
Open the Panel Configs
Open the Panel's Settings
Open the Ticket Options menu
Click on Edit Ticket Message
In the Message Text field place one of this two options
{@Role Name}(Case Sensitive){Role ID}
Save changes
Make sure to replace the Role Name or Role ID with the Name or ID of the role you want to ping

How do I set a transcript channel?
A transcript is the HTML file that contains the messages of the ticket, for more information on what transcripts are, check our documentation on it
Go into the Dashboard
Open the Panel Configs
Go into the Transcript section
Select a Transcript Channel
Save changes

How do I limit the number of tickets a user can create?
To prevent a single user from opening several tickets on your server at once, you can restrict the amount of tickets they can create in two ways:
Global Limit
You can restrict the amount a user can open across all your panels, to update this limit follow this process:
Go into the Dashboard
Open the Server Configs
Update the Global Ticket Limit field
Save changes

Panel's Ticket Limit
The second alternative is to limit the amount of ticket a user can create per each panel, for that do these steps:
Go into the Dashboard
Open the Panel Configs
Go into the Limits Option
Update the Ticket Limit counter
Save changes

How do I set what category tickets are created in?
By default all of your tickets will be placed at the top of your server, to change this:
Go into the Dashboard
Open the Panel Configs
Open the Category Options
Select a category at the Category Open picker
Save changes

How do I set what category tickets are moved to when closed?
If no category is set, whenever the tickets are closed they will be placed on the top of the server, to change that follow this process:
If no category is set, whenever a ticket is closed, it will remain in the category selected for opened tickets. If no category is set there, tickets will remain at the top of the channel list. To change that follow this process:
Go into the Dashboard
Open the Panel Configs
Open the Category Options
Select a category at the Category Closed picker
Save changes

How do I set the permissions for tickets?
You can modify the set of permissions Ticket Tool will apply whenever tickets are opened or closed, to do so:
Go into the Dashboard
Open the Panel Configs
Open the Permission Options
Select what type of permissions you want to change
Modify permissions using the


 buttons
Save changes

How do I create a panel?
This is the core of Ticket Tool, so its important to do the adequate process:
Go into the Dashboard
Click on the green plus button at the top right of the screen
Give your panel a name
Click once on Create

We highly recommend to check our Setup Documentation in order to set the bot
How do I send a panel to my Discord?
Once you have created a panel make sure to send it:
Go into the Dashboard
Open the Panel Configs
Identify a panel to send
Choose the channel from the picker
Send the panel

How do I add or remove users from a ticket?
For such purpose Ticket Tool counts with two commands:
$add User / Role$remove User / Role
Or, the slash version of both commands:
/add User / Role/remove User / Role
You can also add the specific ticket you want to add or remove a user/role from at the end of the prefixed command. Use the ticket option when using slash commands. This is particularly useful if you don't want to execute the commands in the same ticket channel but rather in a private channel. Example:
$add User / Role #channel$remove User / Role #channel
You can either mention the user or role you want to add/remove, or use its ID
How does claiming work?
This feature is exclusive from the Premium System
Claiming allows your Support Team to claim and be assigned to a ticket, for more information on how this module works please check out our Claiming Documentation
How much is premium and how many servers can I use it on?
Our premium subscriptions are $8 per month or $66 yearly and can be purchased directly through our website. For any billing question join our Support Server
Please note that users purchasing premium from Discord's app store have limited control over managing it. You cannot purchase annual subscriptions nor transfer them to any other server. We strongly recommend you purchase premium through our dashboard. For more information, please visit our Premium page.
How can I select or transfer the server for my premium subscription?
Head to our Subscriptions Page
Click Manage under your active subscription
On the left side of the panel, click on Add Server or use the transfer icon to select a new server

Please note that changing the server your subscription is redeemed on can not be done for Discord subscriptions. To purchase premium directly with us please, visit our Premium Page.
I've lost access to my Discord account, how do I get my subscriptions back?
It is important to note that your subscription is not directly linked to your Discord account, but rather it is linked to the email that you purchased premium with. In order to change the account that can manage your subscriptions, please open a billing ticket in our Support Server and request the change by providing us:
The email you created the subscription with
The ID and username of the account that will manage the subscriptions
The latest invoice for the subscription
I have a premium key, how do I use it?
To use, redeem or transfer a premium key, please reach out to our Billing Team in our Support Server.
How can I subscribe to premium and which payment methods can I use?
You can subscribe using by visiting the Premium tab in your server's dashboard or by going into the premium purchase page directly. We accept the following payment methods:
All major debit & credit card
PayPal
Google Pay (Chrome Only)
Apple Pay (Safari Only)
How does Ticket Tool store transcripts?
Ticket Tool does not store any transcripts at all, once it generates the transcript it's sent as a message to your Discord server, (we delete it from our systems to keep your data's privacy). All of our transcripts are stored directly on Discord's servers, we don't have any kind of access to them, once you delete the message in which the bot sent the HTML file Discord will remove it from it's cache and won't be accessible any longer. The URL to our website is just a rendering of the file stored in Discord's CDN.
How do I set a custom emoji in my buttons?
Go into the Dashboard
Open the Panel Configs
Open the Button Options page
Select a button and open it's Settings
Click the Select button in the Button Emoji field
Head to the ✳ section inside the Emoji picker
Select the new emoji
Save changes

Last updated